Teaching your dog how to get into
the "basic position" is
not an easy task. Watch the YouTube video
and follow my step-by-step instructions
to learn how it can be done with ease! [Links to Part 1 - 2 - 3 - 4]
The "BASIC POSITION".
Part 3 of 4: Teaching our dog how get
into the basic position - from anywhere.
By the time you are ready to work through this
part, your dog should have learned to get into
the basic position from behind your back and to
look up (to pay attention to his source of treats).
Excellent!
There is one catch though. When we are outside
with our dogs, it is not really practical to wait
until they are right behind us before we can call
them into the basic position... Part 3 of this
exercise is an extension of the second part. We
want our dogs to learn how to get into the basic
position from no matter where they are.
In competitive obedience, there are a number
of ways for dogs to get into the basic position.
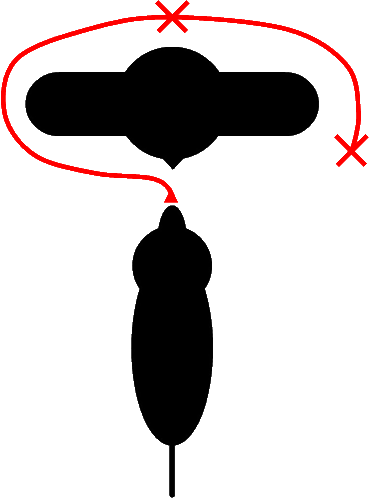
In most cases, the dog approaches the handler
from the front. From that position the dog can
either:
(a) move its rear end to the right (~180 degrees)
until he stands left to the handler;
or (b) circle clockwise around the handler until
he stands left to him.
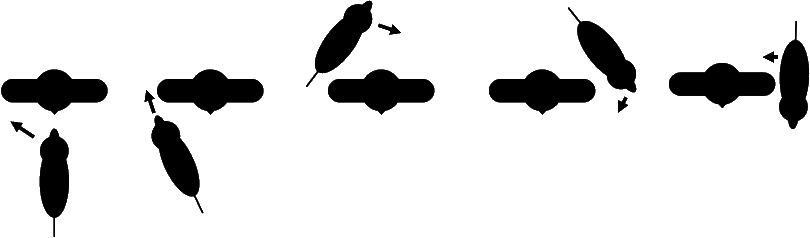
Regardless of what method we choose, they all
end with the dog sitting down in the basic position
on the handler's left side. If you are planning
on showing in obedience, you want to work on an
perfectly straight sit. Even though method "a"
is very common in competitive obedience, I have
primarily used method "b" with my dogs (Andy knows
how to do it both ways, but I am only using method
"a" to correct him into the right position if
has done a sloppy job getting into the basic position
the first time around).
Let's get started.
| Step 1 |
As always, get your treats, your clicker
and a toy. Put the treats into your pocket
or a belt pouch. |
| Step 2 |
Make sure your dog can focus exclusively
on you, avoid any disturbance. Training
indoors or in your backyard is a good idea.
|
| Step
3 |
Position yourself in front of your dog.
It does not matter whether your dog sits
or stands as long as he does not move around
too much. |
| Step
4 |
Take one of your treats in your right hand
and hold it in front of your dog's nose.
I am sure you will have his attention now! |
| Step
5 |
With the treat as your lure, move your
right hand towards you and then to the right
past your hip. You dog should follow your
moving hand closely. Continue to move your
hand behind your back. Right behind your
back, switch and take the treat into your
left hand. Continue the circular motion
and move the treat past your left hip. Your
dog should still follow your motion.
|
| Step
6 |
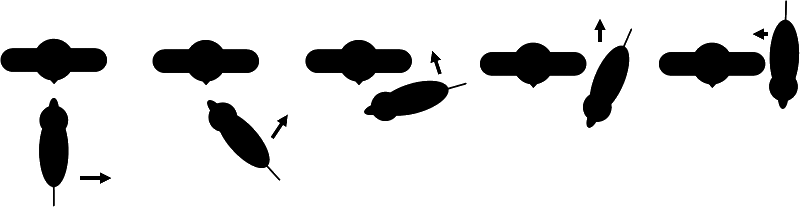
When your dog's head comes around your
back, move your hand up so he needs to lift
his head to stay close to the treat. Continue
to move the treat forward and up until your
dog stands next to you.
|
|
| Step
7 |
Once your dog is next to you, hold the treat at shoulder-hight and tell him
to "Sit" (if he does not already do it by himself).
|
| Step
8 |
Reward your dog with a click and the treat
when he sits down AND looks up.
|
Initially, we don't care about speed or
accuracy. We just want our dog to learn
that if he follows the treat around us,
he will be rewarded. If your dog made good
progress with the exercise in Part 2, he
should already know where the basic position
is and that he needs to sit and look at
you for the reward. Holding the treat next
to your head or at shoulder level (when
at step 7 above) is a nice memory aid. In
my experience, you need the extra Sit cue
only the first few times.
|
| Step
9 |
After your dog reliably follows your hand
closely into the basic position, continue
this exercise but move your hand with the
treat more quickly. Within a few repetitions
your dog will have learned that he will
be rewarded for circling around you into
the basic position, even without the treat
right in front of his nose.
|
Now it is time to introduce a verbal cue.
I have heard some people use "Swing" or
"Side" as verbal cues. I am sure this
works just fine. A lot of handlers in the
Schutzhund sport however use the German
word "Fuss" (pronounced "fooss") to get
their dogs into the basic position. I use
this cue as well. The English equivalent
to Fuss is the "Heel" cue. This is less
confusing than you might think. For your
dog, heeling is nothing other than staying
in the basic position will walking or running.
In any event, feel free to substitute the
verbal "Fuss" cue with any other verbal cue of your
choosing.
|
| Step
10 |
Repeat step 9 multiple times over the next
few days, but this time, use the "Fuss"
cue every time you start moving your
hand away from your dogs nose. Reward your
dog only after he circled around your and
finishes in the Sit position AND looks up
to you (use your verbal or mechanical marker
to mark the reward and then feed your dog
the treat).
|
| Step
11 |
Go back to step 3 and give your dog the "Fuss" cue without showing him the treat and without circling the treat around yourself to test if he has learned his lesson. If he has not, go back one step and keep on working. If he did it right, reward him and praise him extensively (= playtime!). |
Congratulations! Your dog has learned all elements
of the getting into basic position routine: (a)
looking up to you, (b) sitting to your left in
the correct position, and (c) to circle around
you to get into the correct position. Now it's
time to put everything together.
|